![]()
![]()
![]()

![]()

Django Celery Panel
DJ Celery Panel brings Celery monitoring directly into Django Admin. No separate services to deploy, no extra infrastructure to maintain — just add it to INSTALLED_APPS and you're done.
Docs
https://yassi.github.io/dj-celery-panel/
Features
- Workers Monitoring: View active Celery workers, their status, pool type, and concurrency
- Task Management: Browse and inspect Celery tasks with detailed information
- Queue Overview: Monitor configured queues and their routing
- Periodic Tasks: View scheduled periodic tasks and their schedules
- Real-time Inspection: Live data from Celery's inspect API
- Django Admin Integration: Seamlessly integrated into your existing Django admin interface
- Swappable Backends: Pluggable architecture for custom data sources and monitoring integrations
Project Structure
dj-celery-panel/
├── dj_celery_panel/         # Main package
│   ├── templates/           # Django templates
│   ├── views.py             # Django views
│   └── urls.py              # URL patterns
├── example_project/         # Example Django project
├── tests/                   # Test suite
├── images/                  # Screenshots for README
└── requirements.txt         # Development dependencies
Requirements
- Python 3.9+
- Django 4.2+
Architecture
Swappable Backend System
Django Celery Panel is built with a pluggable backend architecture that allows you to customize how data is retrieved and displayed. Each feature area (tasks, workers, queues) uses a configurable backend class, making it easy to adapt to different Celery configurations or add custom functionality.
Why Swappable Backends?
- Flexibility: Switch between different data sources (inspect API, database, custom APIs)
- Extensibility: Implement custom backends for specialized needs
- Performance: Choose backends optimized for your infrastructure
- Future-proof: Add support for new Celery features without breaking changes
Available Backends
Tasks Backends:
- CeleryTasksDjangoCeleryResultsBackend - Uses django-celery-results for comprehensive task history (default)
- Custom: Implement your own by extending CeleryAbstractInterface
Workers Backends:
- CeleryWorkersInspectBackend - Real-time worker data via Celery's inspect API (default)
- Custom: Could implement monitoring via Redis, custom metrics services, etc.
Queues Backends:
- CeleryQueuesInspectBackend - Queue information via Celery's inspect API (default)
- Custom: Could implement queue monitoring via broker-specific APIs
Periodic Tasks Backends:
- CeleryPeriodicTasksConfigBackend - Reads from CELERY_BEAT_SCHEDULE configuration (default)
- CeleryPeriodicTasksDjangoCeleryBeatBackend - Reads from django-celery-beat database
- Custom: Could implement schedule management via custom schedulers
Example: Custom Backend
class CustomTasksBackend:
    """Custom backend that fetches tasks from your own API."""

    def get_tasks(self, search_query=None, page=1, per_page=50):
        # Your custom implementation
        # Fetch from external API, custom database, etc.
        return TaskListPage(...)

    def get_task_detail(self, task_id):
        # Your custom implementation
        return TaskDetailPage(...)

# Configure in settings.py
DJ_CELERY_PANEL_SETTINGS = {
    "tasks_backend": "myapp.backends.CustomTasksBackend",
}
This architecture means you're never locked into a specific implementation. As your infrastructure evolves, Django Celery Panel can evolve with it.
Screenshots
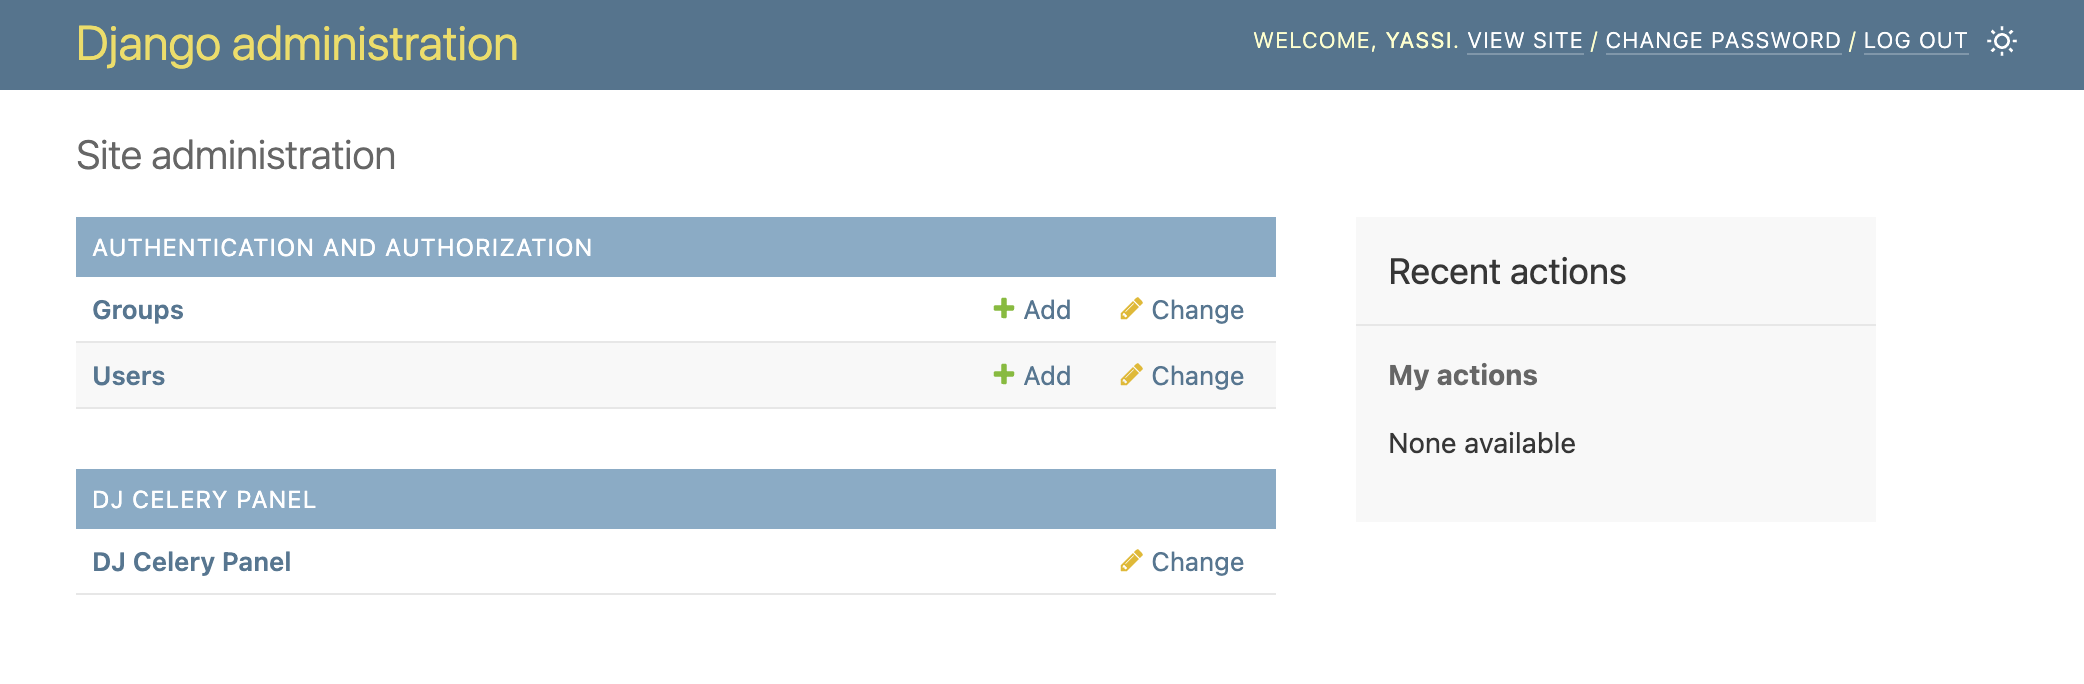
Django Admin Integration
Seamlessly integrated into your Django admin interface. A new section for dj-celery-panel will appear in the same places where your models appear.
NOTE: This application does not actually introduce any model or migrations.
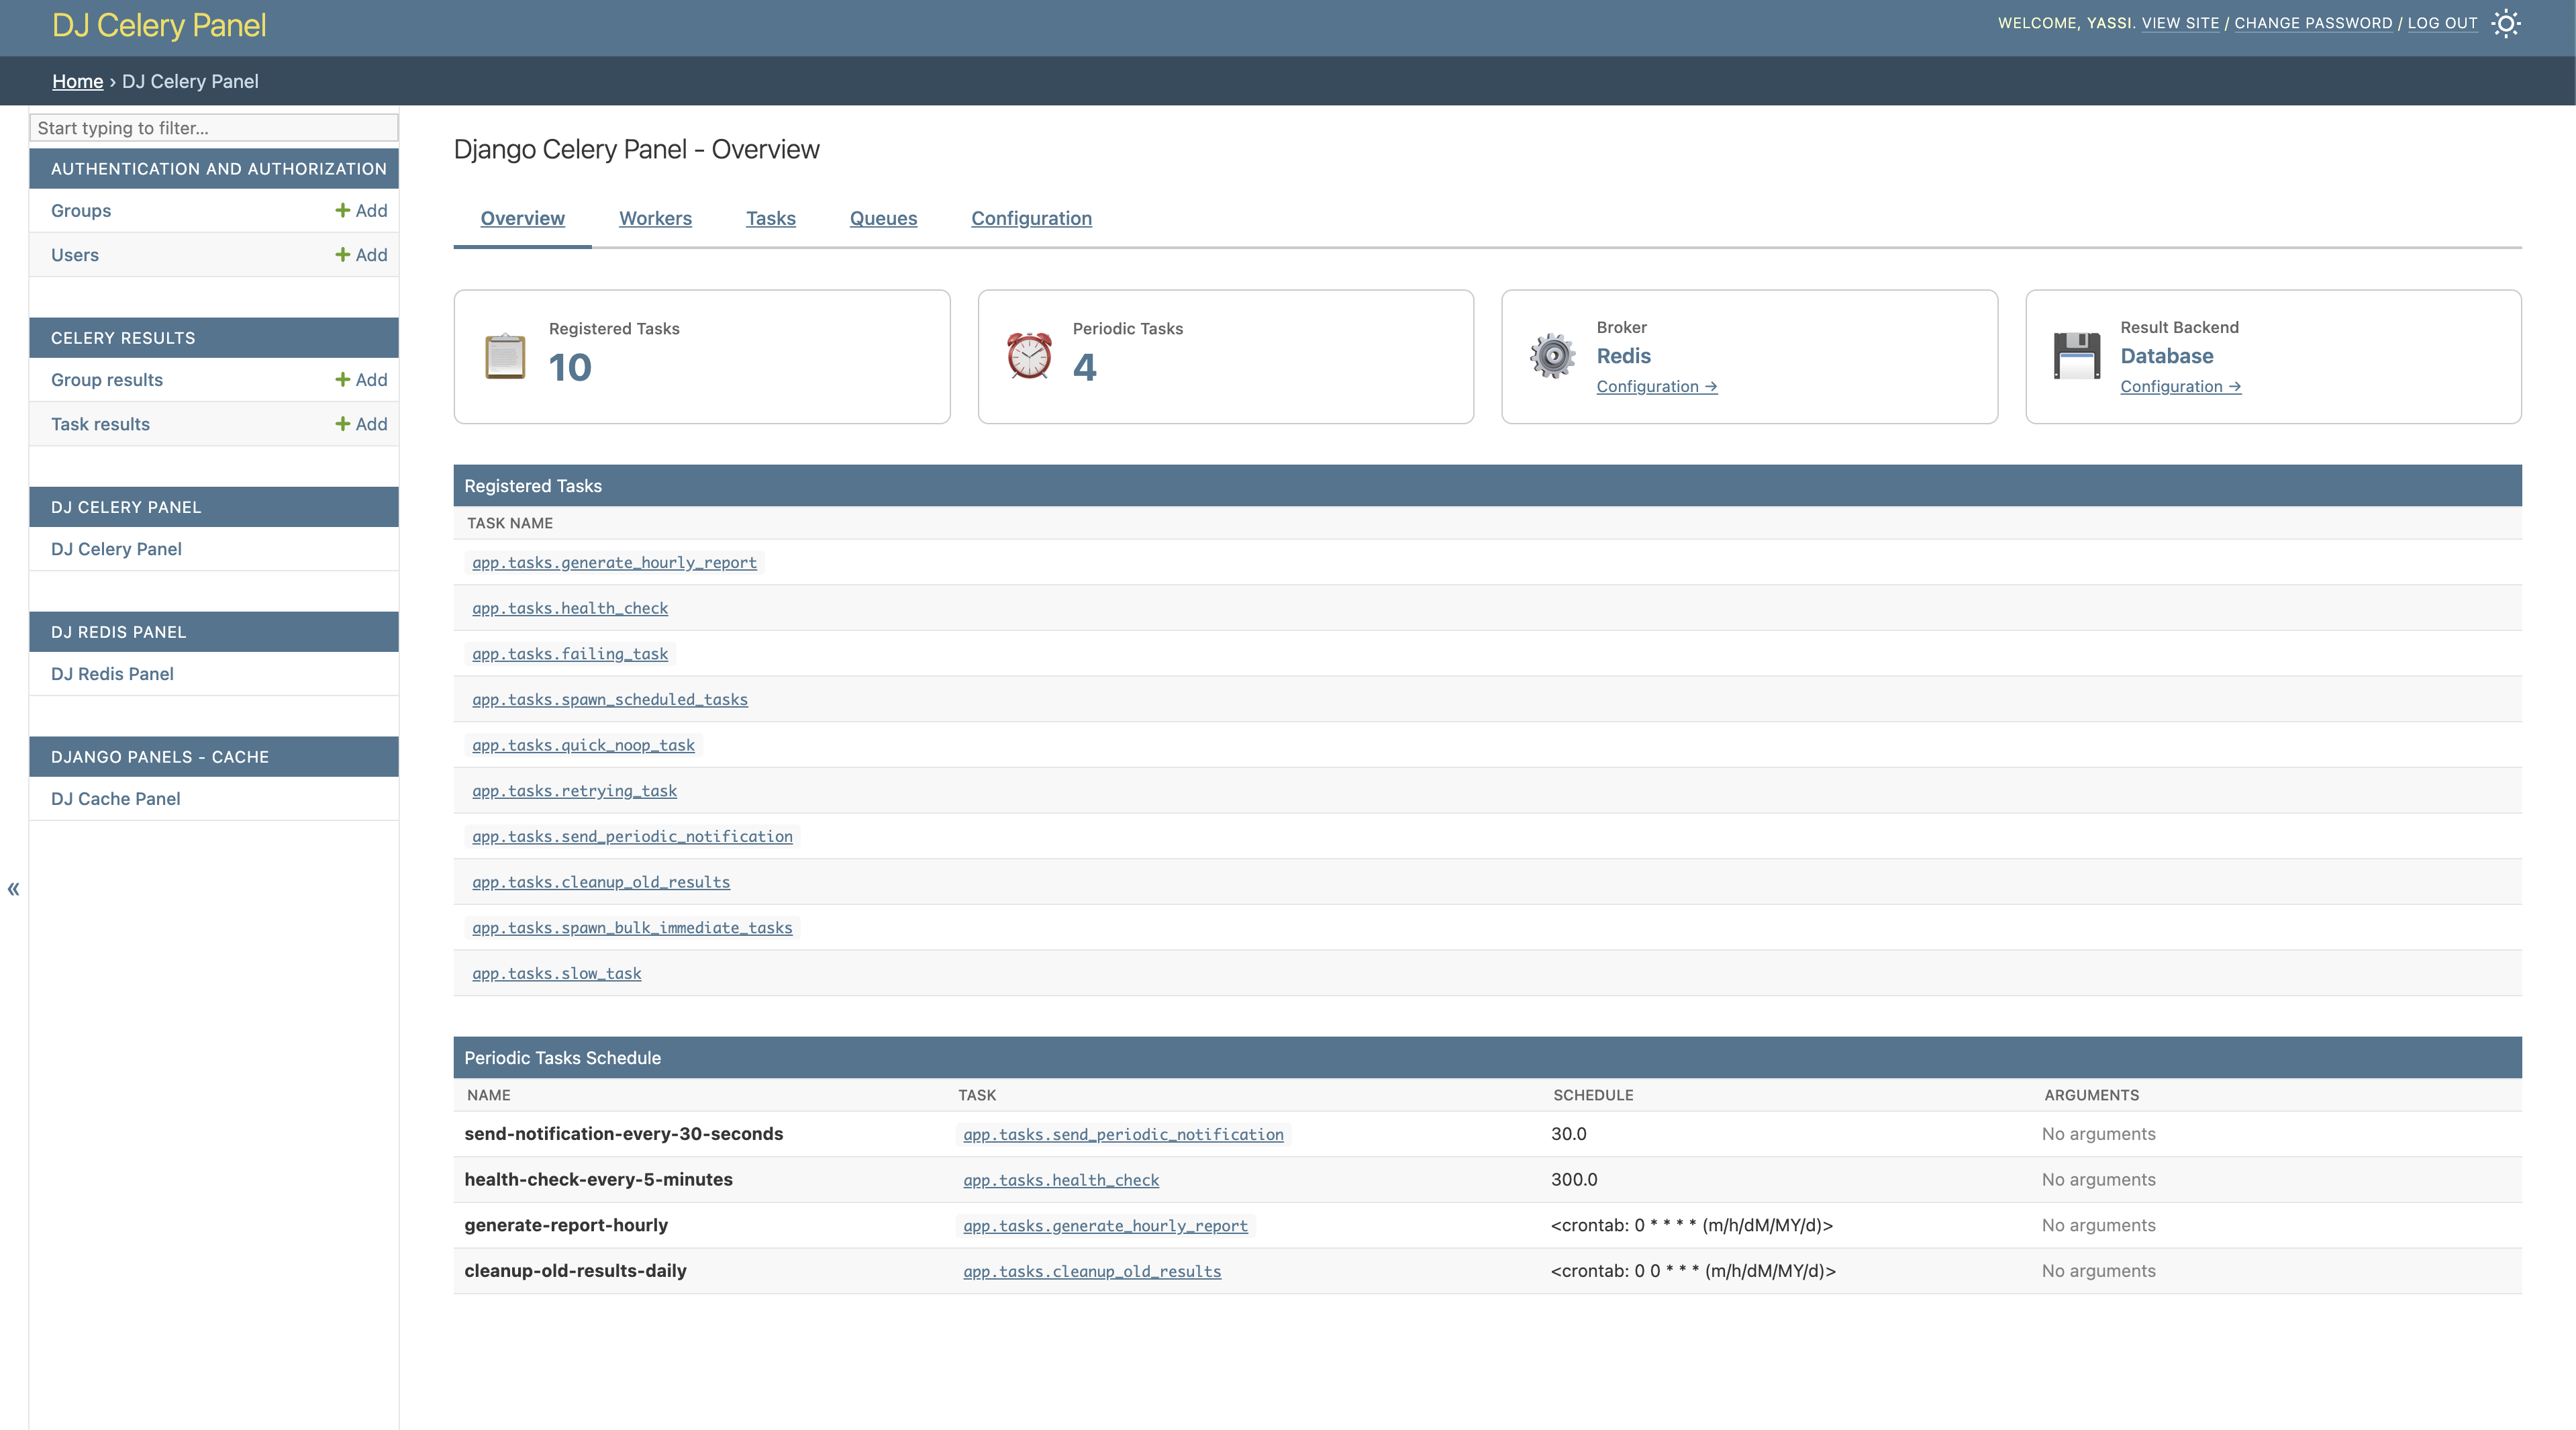
Dashboard Overview
Get a quick overview of your Celery infrastructure including active workers, recent tasks, and queue status.
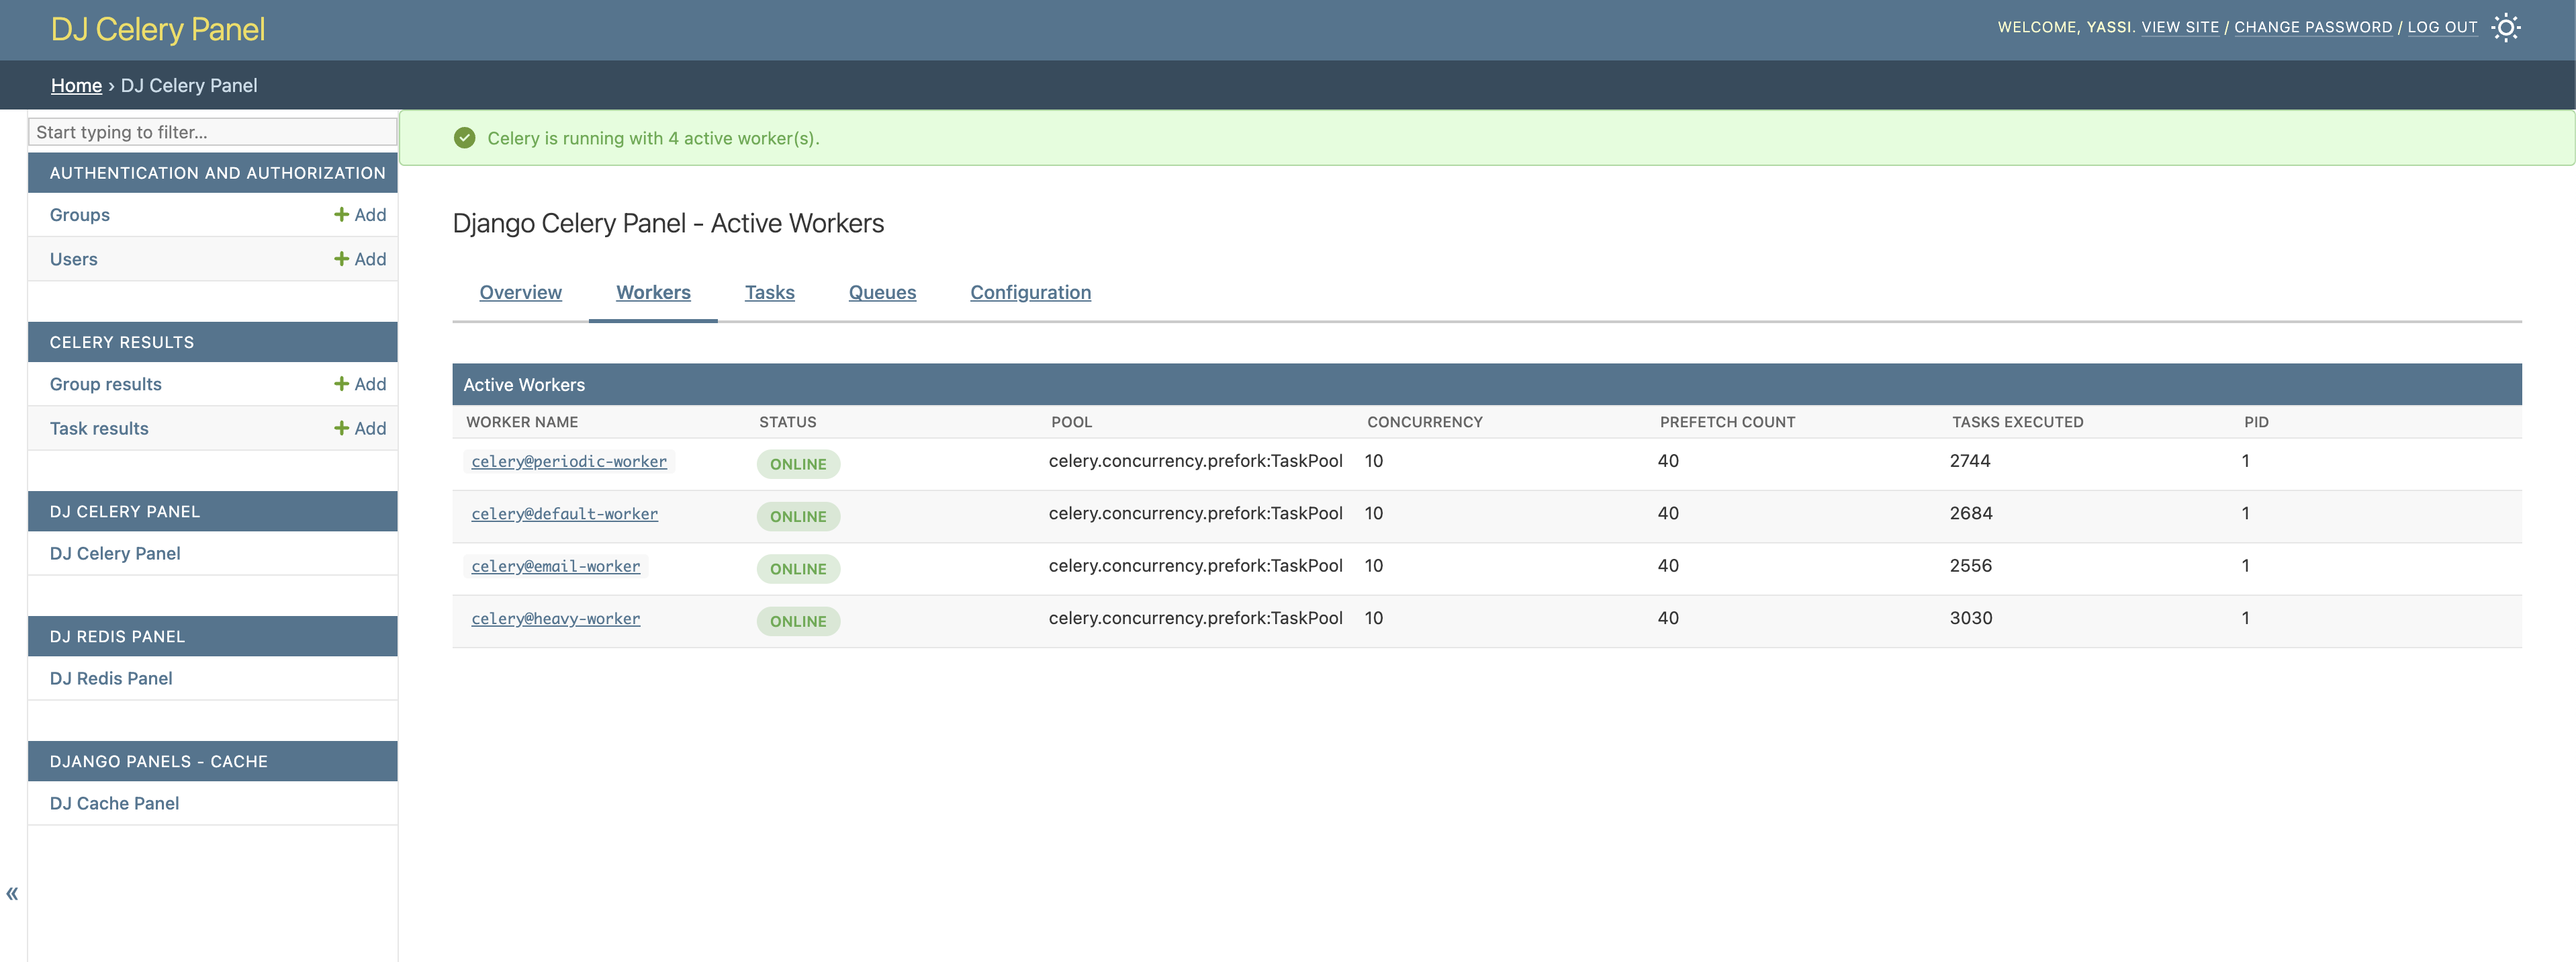
Workers Monitoring
View all active Celery workers with detailed information about their status, pool type, concurrency, and processing capabilities.
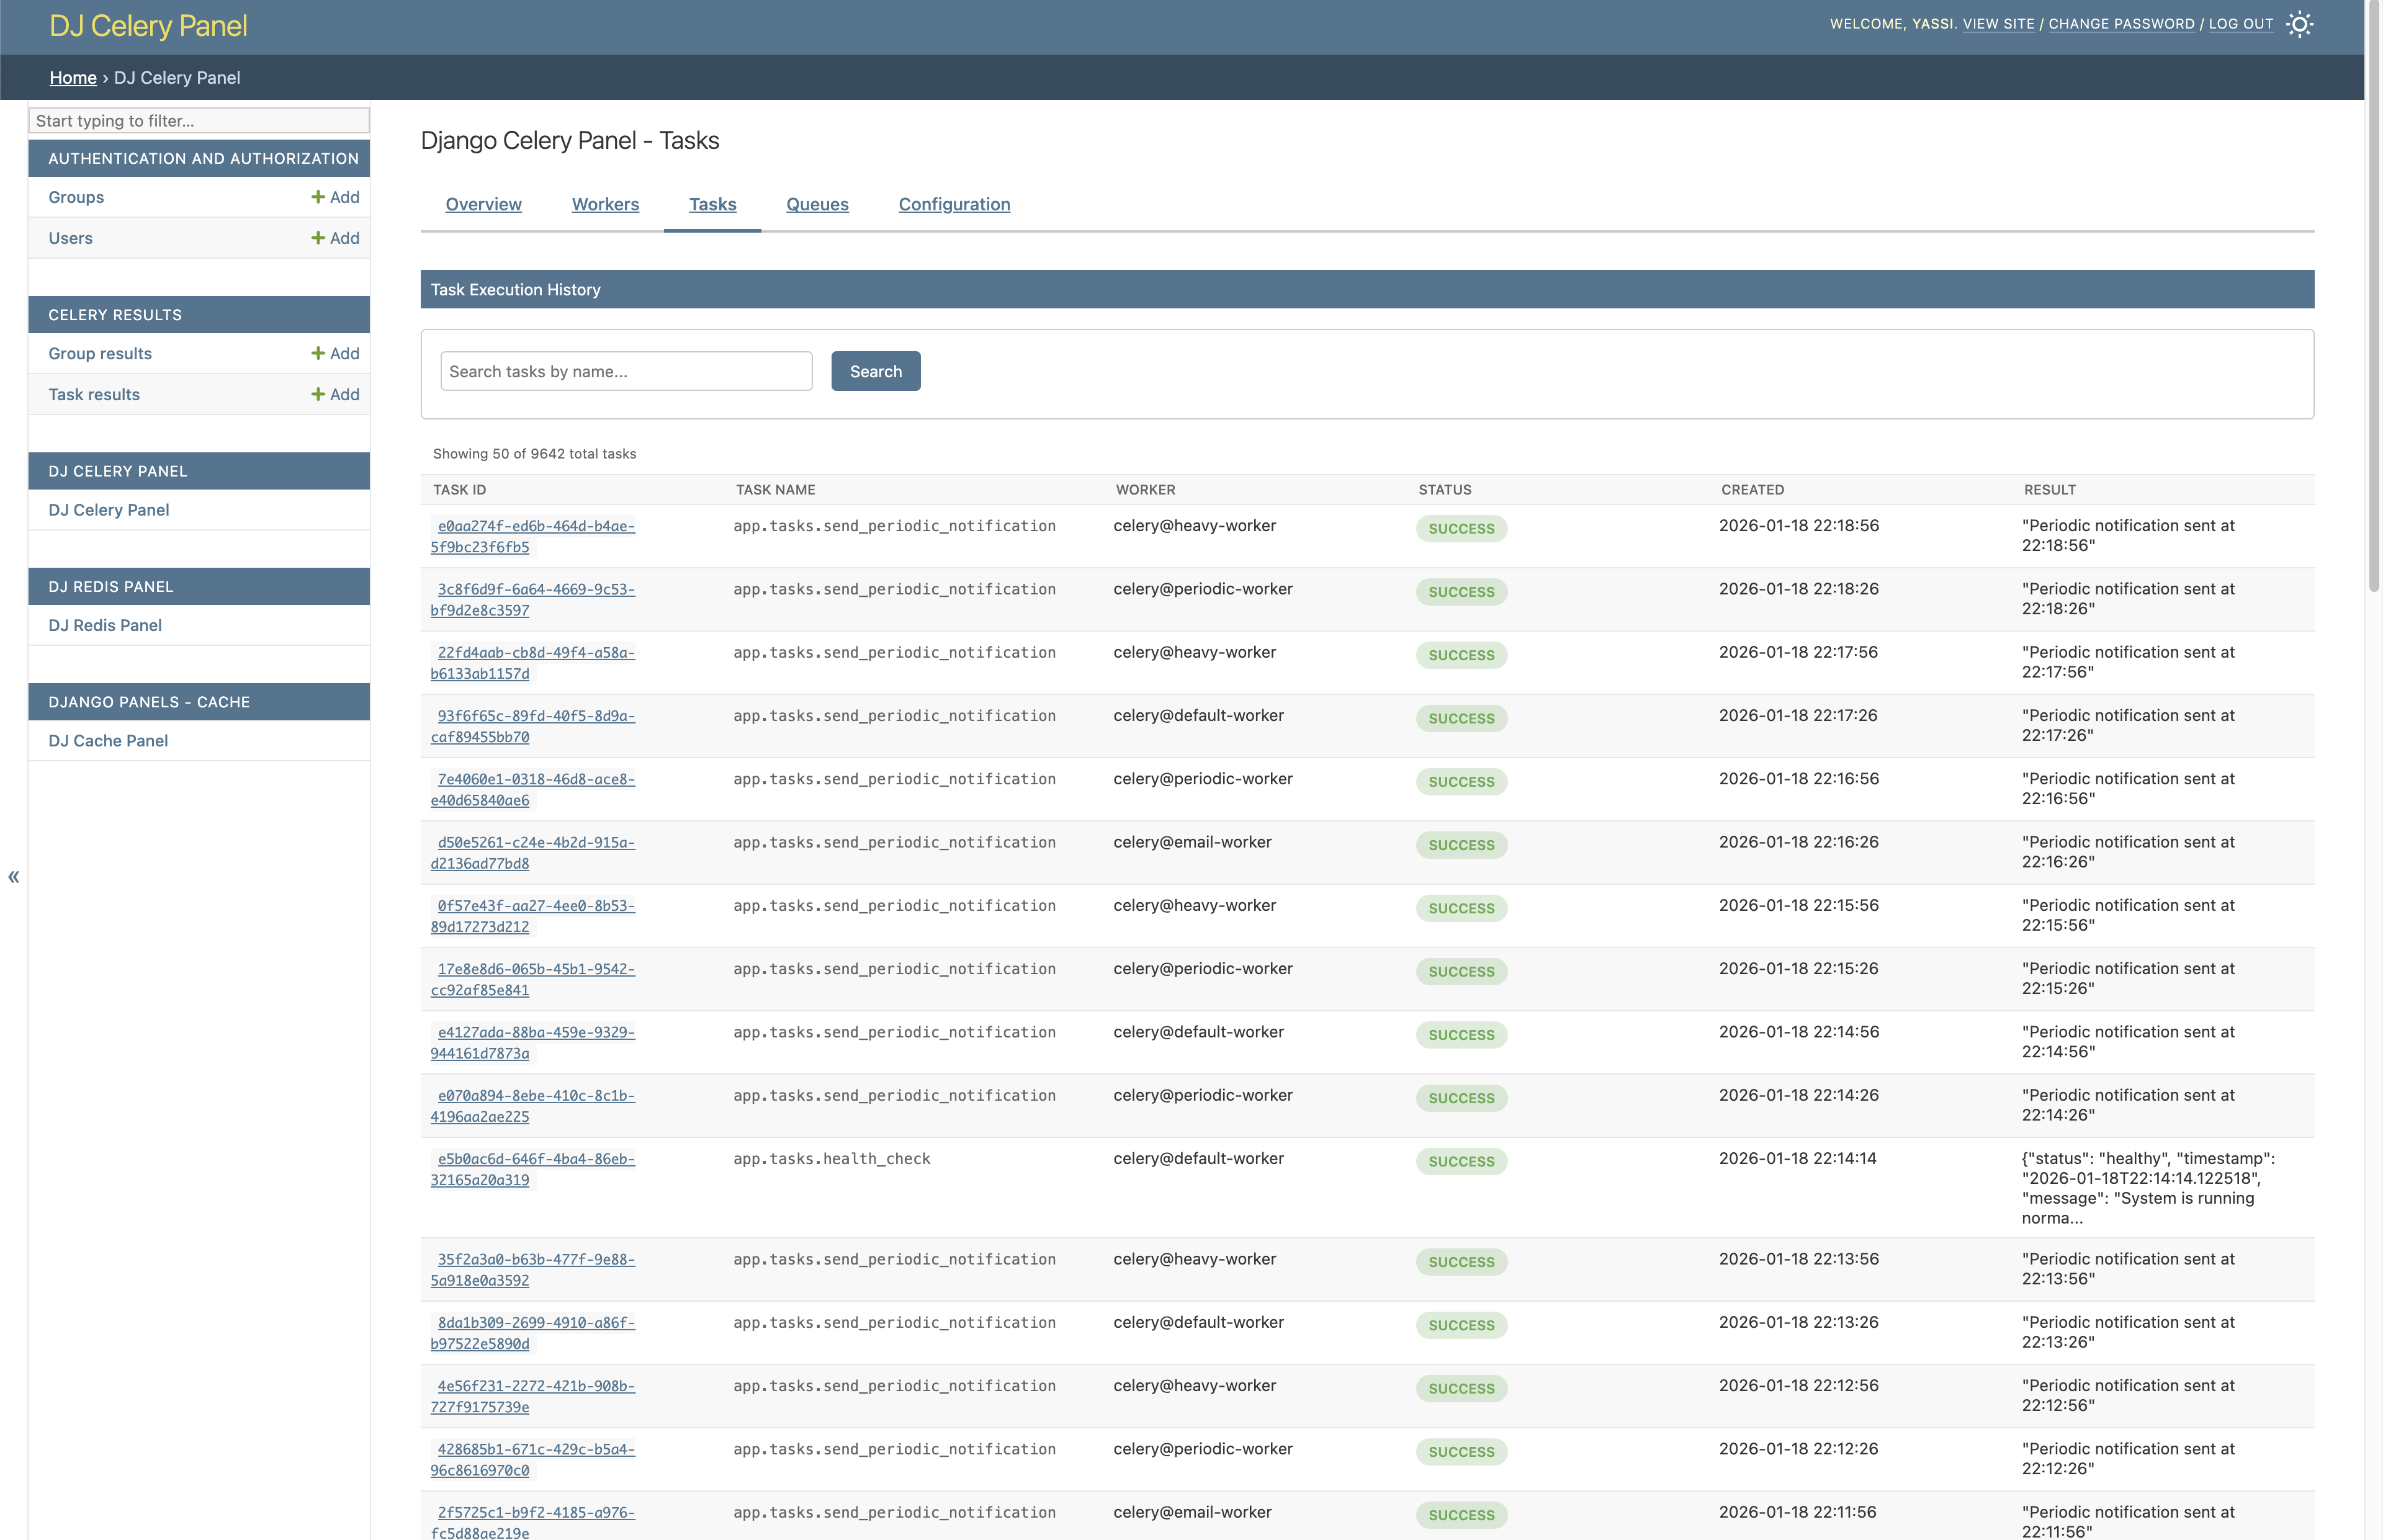
Task Management
Browse and inspect your Celery tasks with complete details including status, arguments, results, and execution time.
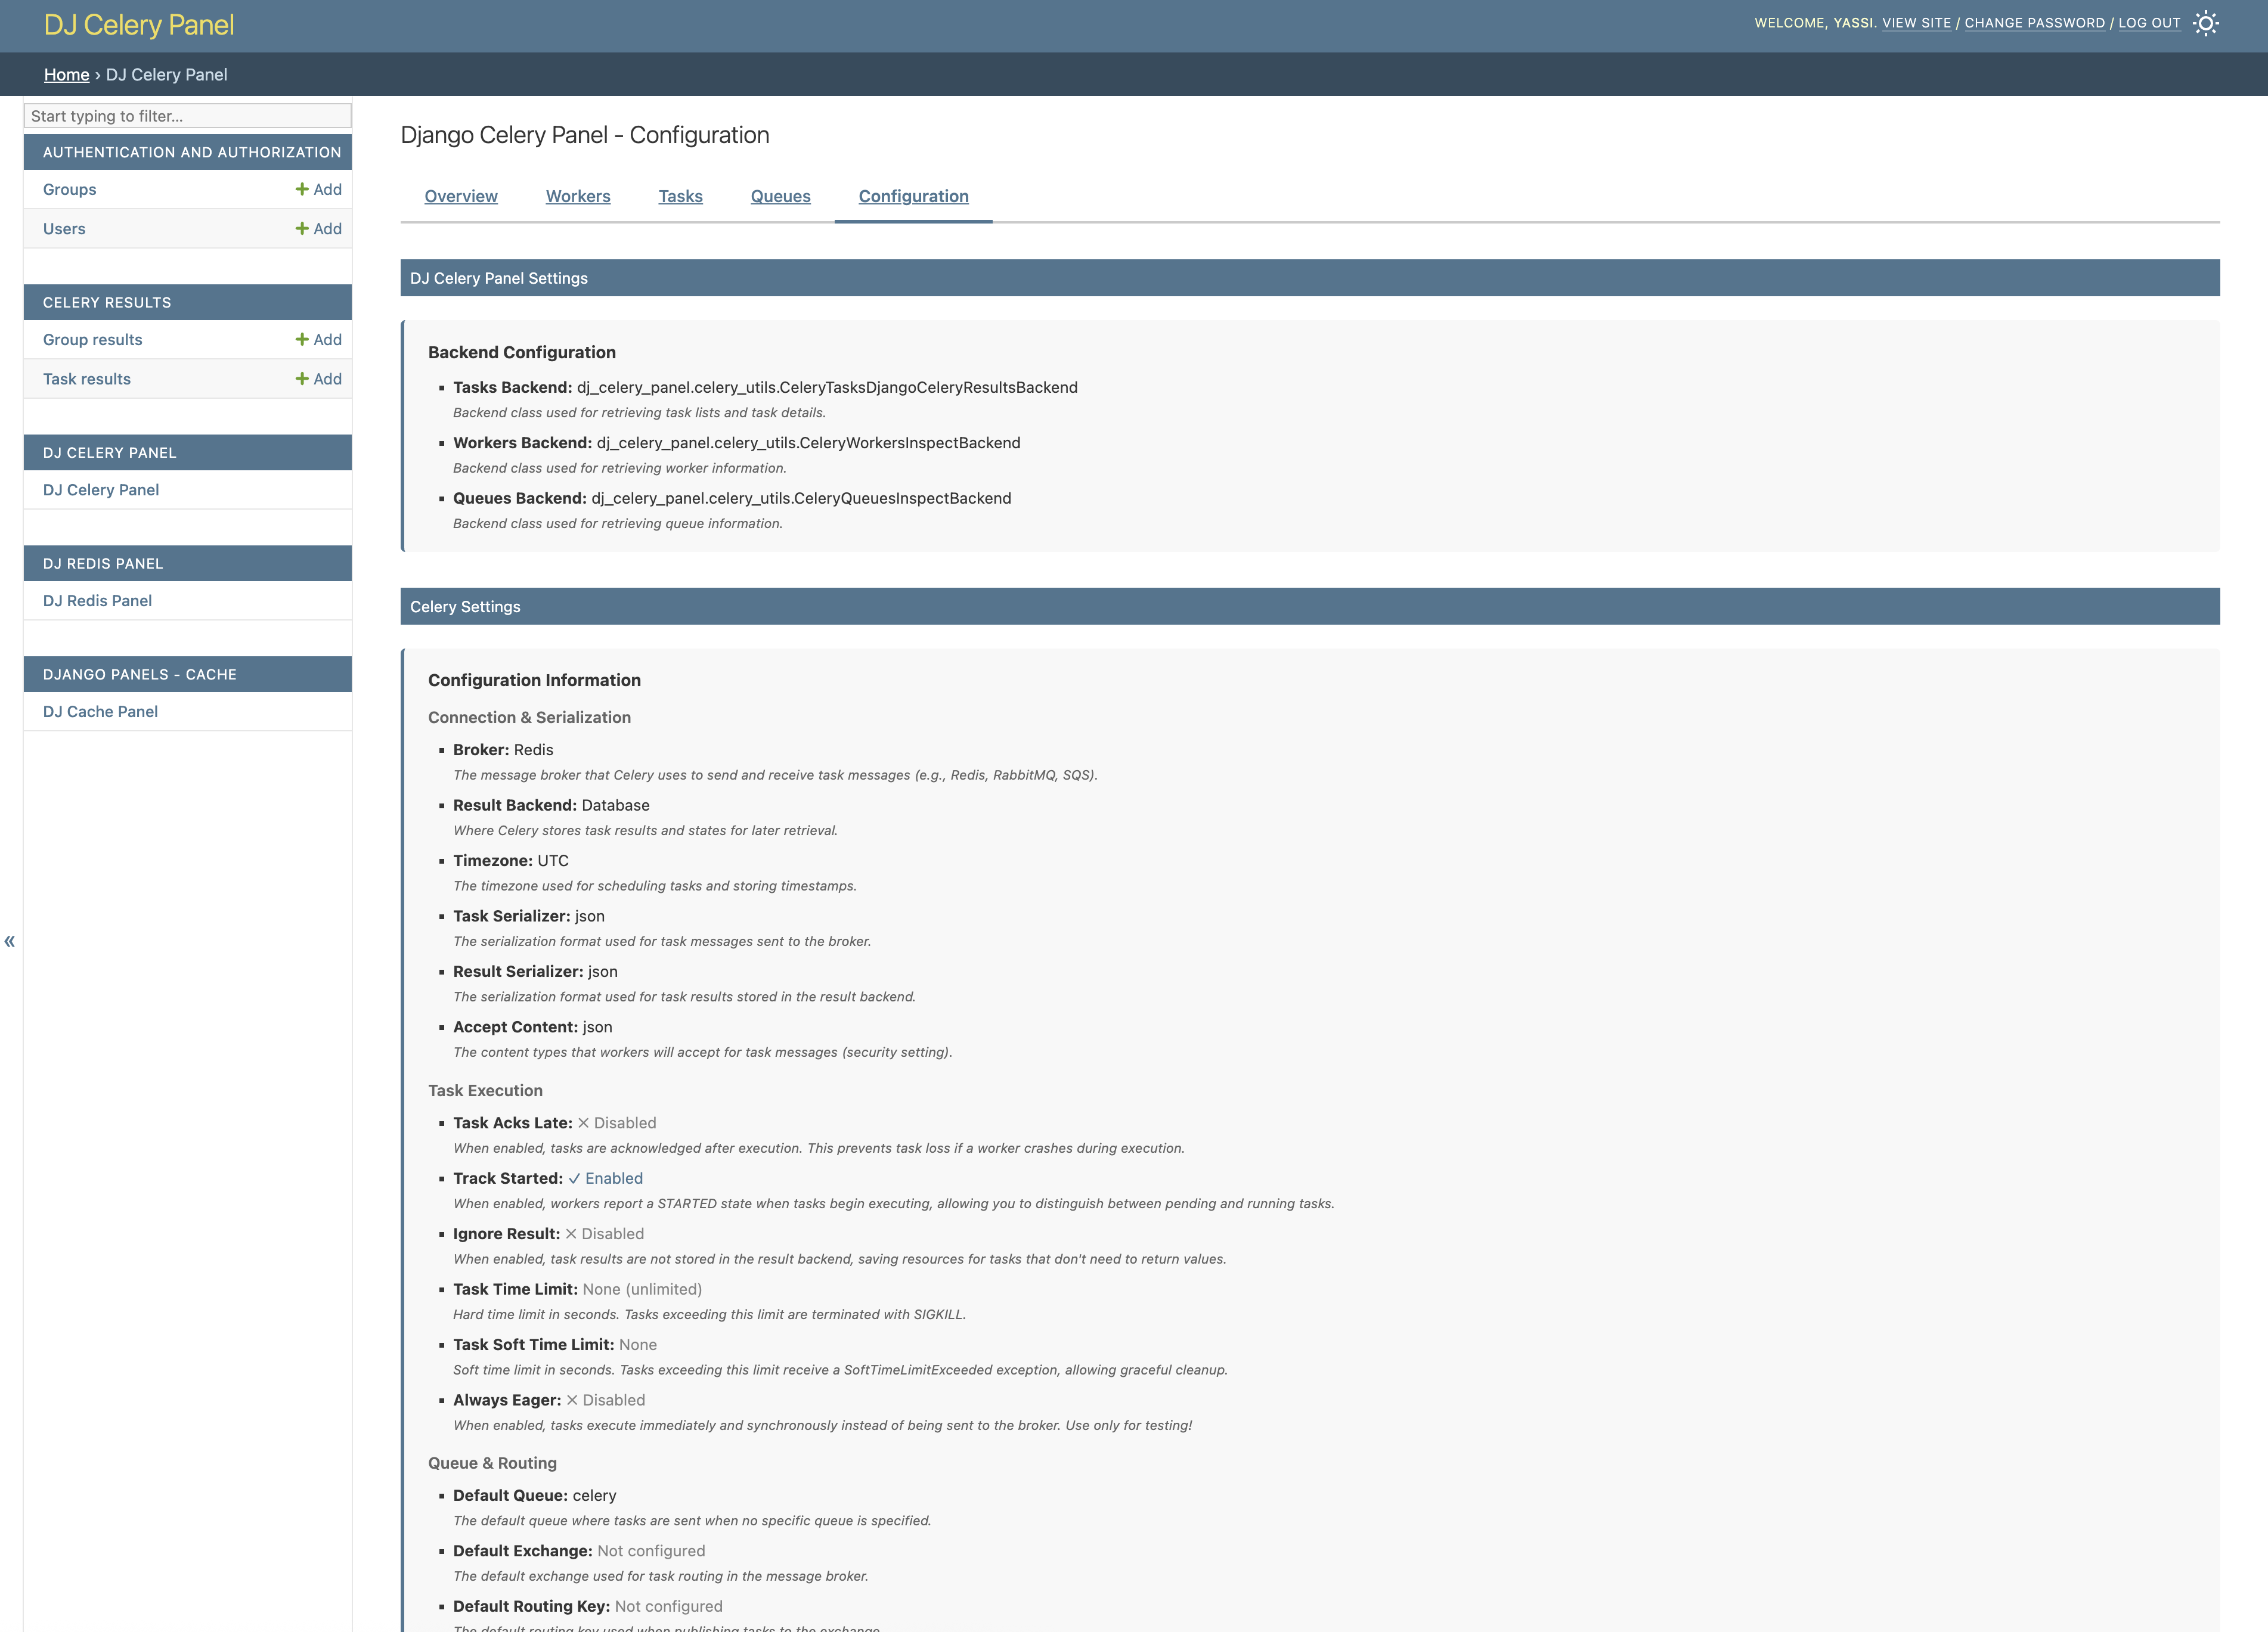
Configuration
View your Celery configuration including broker settings, result backend, and other runtime parameters.
Installation
1. Install the Package
pip install dj-celery-panel
2. Add to Django Settings
Add dj_celery_panel to your INSTALLED_APPS:
INSTALLED_APPS = [
    'django.contrib.admin',
    'django.contrib.auth',
    'django.contrib.contenttypes',
    'django.contrib.sessions',
    'django.contrib.messages',
    'django.contrib.staticfiles',
    'dj_celery_panel',  # Add this line
    # ... your other apps
]
3. Configure Celery Settings
Django Celery Panel works with your existing Celery configuration. Ensure you have Celery properly configured:
# Celery Configuration
CELERY_BROKER_URL = 'redis://localhost:6379/0'  # or your broker URL
CELERY_RESULT_BACKEND = 'django-db'  # or your preferred backend

# Optional: Advanced configuration
DJ_CELERY_PANEL_SETTINGS = {
    # Backend classes for each interface
    "tasks_backend": "dj_celery_panel.celery_utils.CeleryTasksDjangoCeleryResultsBackend",
    "workers_backend": "dj_celery_panel.celery_utils.CeleryWorkersInspectBackend",
    "queues_backend": "dj_celery_panel.celery_utils.CeleryQueuesInspectBackend",

    # CSS: load built-in styles and/or inject your own
    "LOAD_DEFAULT_CSS": True,
    # Static paths are relative to app's static/ dir (e.g. 'myapp/css/overrides.css'
    # for a file at myapp/static/myapp/css/overrides.css). Full URLs also accepted.
    "EXTRA_CSS": [],
}
Note: The panel requires at least one Celery worker to be running to display worker and queue information.
4. Include URLs
Add the Celery Panel URLs to your main urls.py:
from django.contrib import admin
from django.urls import path, include

urlpatterns = [
    path('admin/dj-celery-panel/', include('dj_celery_panel.urls')),  # Add this line
    path('admin/', admin.site.urls),
]
5. Run Migrations and Create Superuser
python manage.py migrate
python manage.py createsuperuser  # If you don't have an admin user
6. Start Celery Worker
Start at least one Celery worker for the panel to monitor:
celery -A your_project worker --loglevel=info
7. Access the Panel
-
Start your Django development server:
bash python manage.py runserver -
Navigate to the Django admin at
http://127.0.0.1:8000/admin/ -
Look for the "DJ_CELERY_PANEL" section in the admin interface
-
Click to browse workers, tasks, queues, and periodic tasks
License
This project is licensed under the MIT License. See the LICENSE file for details.
Development Setup
If you want to contribute to this project or set it up for local development:
Prerequisites
- Python 3.9 or higher
- Redis server (for Celery broker)
- PostgreSQL (optional, can use SQLite)
- Git
- Docker (recommended)
Docker is recommended since it automates the setup of all required services including Redis, PostgreSQL, and Celery workers.
1. Clone the Repository
git clone https://github.com/yassi/dj-celery-panel.git
cd dj-celery-panel
2a. Set up dev environment using virtualenv
python -m venv venv
source venv/bin/activate  # On Windows: venv\Scripts\activate

pip install -e . # install dj-celery-panel package locally
pip intall -r requirements.txt  # install all dev requirements

# Alternatively
make install # this will also do the above in one single command
2b. Set up dev environment using docker
make docker_up     # Bring up all services (Redis, PostgreSQL, Celery workers)
make docker_shell  # Open a shell in the docker container
3. Set Up Example Project
The repository includes an example Django project for development and testing
cd example_project
python manage.py migrate
python manage.py createsuperuser
4. Start Celery Worker
For development, start at least one Celery worker:
cd example_project
celery -A example_project worker --loglevel=info
5. Run the Development Server
python manage.py runserver
Visit http://127.0.0.1:8000/admin/ to access the Django admin with Celery Panel.
6. Running Tests
The test suite requires running services (Redis, PostgreSQL, and at least one Celery worker) to test the monitoring functionality.
Using Docker (Recommended)
Docker automatically starts all required services:
make test_docker
Local Testing
For local testing, ensure services are running:
# Terminal 1: Start Redis
docker run -d -p 6379:6379 redis:7

# Terminal 2: Start PostgreSQL (optional, can use SQLite)
docker run -d -p 5432:5432 -e POSTGRES_PASSWORD=postgres postgres:16

# Terminal 3: Start Celery worker
cd example_project
python manage.py migrate
celery -A example_project worker --loglevel=info

# Terminal 4: Run tests
pytest tests/ -v
GitHub Actions
The CI pipeline automatically: - Starts Redis and PostgreSQL services - Runs database migrations - Starts a Celery worker in detached mode - Executes the full test suite with coverage reporting